
Which Sci-Fi Movie Featured A Cameo Appearance By The Millennium Falcon? |
|
Think you know the answer? |
|

Source: How-To Geek
Which Sci-Fi Movie Featured A Cameo Appearance By The Millennium Falcon? |
|
Think you know the answer? |
|

Bookmarks are great to keep your favorite sites nearby, but they aren’t the fastest option out there. Instead, why not add shortcuts for your favorite websites right on the Chromebook shelf?
If there’s a site you go to multiple times per day—especially if it’s critical to your business—every added step means more time you have to spend getting where you need to be. Having your favorite websites right on your Chromebook’s shelf (the taskbar at the bottom where you see open app icons) makes getting to them that much quicker.
Start by visiting the website for which you’d like to have a shortcut. Select the three-dot menu in the upper-right.

Hover over the “More Tools” menu and then select “Create Shortcut.”

Change the name of the shortcut if you want, and then click “Create.”


Google currently has two music streaming services: Play Music and YouTube Music. The latter is eventually supposed to replace the former, but it’s been out for months with very little real progression.
Andrew Martonik, writing at Android Central, makes an excellent point with a scathing look at the current state of YouTube Music:
Whether you look at it as three years or just six months old, one thing is clear: YouTube Music isn’t finished yet, is filled with issues and is incredibly frustrating to use on a daily basis considering it costs the industry-standard $10 per month.
YouTube Music is so unfinished and lacking features that I question whether Google has any intentions of following through with its vision of replacing Google Play Music entirely. Put simply, I can’t believe Google thinks anyone will pay $10 per month for it when all signs point to Google itself not caring about YouTube Music’s success.
And it couldn’t be truer. Just this morning I found myself toying with the idea of dropping Play Music/YouTube Music and moving my family over to Spotify. But then I remembered the kicker: YouTube Premium.
Martonik also points out that the real value in Google’s music streaming service(s) is the inclusion of YouTube Premium, which removes ads from all YouTube Videos (including movies)—so really, we’re all just paying for YouTube Premium and getting a music service for free. I’m completely in agreement with his assessment, because currently, both of Google’s music services treat subscribers like second-class citizens (even in Google’s own apps) and aren’t worth the monthly premium when compared to services like Spotify and Apple Music.
If Google truly plans on replacing Play Music—which is currently much better than YouTube Music, despite its own set of drawbacks—with YouTube Music, then it has a lot of work to do.
via Android Central

Upgrading your desktop PC isn’t nearly as hard as you might think, but one of the harder parts is choosing the right…well, parts. Compatibility conflicts can be intimidating for a $1000 machine. Amazon wants to help with its latest feature.
The new “Part Finder” is broadly similar to third-party tools like PCPartPicker, with the advantage of being integrated directly with Amazon’s nigh-limitless product listings. But unlike those more comprehensive tools, Amazon’s only supporting upgrades at the moment, not complete system builds. You’ll need to click “Make sure this fits” in the item description, then enter the model or serial number of an existing laptop or desktop to check and see if the part is compatible. Once you’ve chosen the brand and model, a bar above the listing will show you the results.
That’s the theory, anyway. At the moment the system isn’t displaying on all PC hardware components, and it’s somewhat iffy even on parts from major brands. For example, after entering my ThinkPad T450s on the Part Finder for a Samsung 850 SSD, the tool says “We’re not sure this item fits your computer.” Which is odd, because that’s a pretty standard 2.5-inch form factor going into a full-sized laptop…and I’ve made and documented that exact upgrade here on How-To Geek.
To be fair to Amazon, this is a brand new feature, and there are bound to be some teething troubles. To be less fair, car enthusiasts have noted similar problems with Amazon’s car parts tool, which works along the same general lines. For the moment you should probably double-check with more extensive online tools to make sure your new parts will work, especially if you’re building your computer from the ground up.
Via PCGamer

Tis the season for covering your home in as many decorations as possible. You want to make sure your home looks more festive than your neighbors’, right? We’ve checked out the best Christmas projectors and laser lights for creating the perfect look for the holidays.
Predictably, there are a lot of tacky options out there. Your home deserves better than that, so we’ve focused on just a few choices that will make your house look good and Christmassy throughout the season. You can easily bring such devices back out year after year too, so these are solid investments. Even better, unlike balancing dangerously on a ladder like Clark Griswold you just set them up in the yard on a stake, plug them in, and you’re good to go.
Here’s our pick of Christmas projectors and laser lights.

The 1byone Christmas Outdoor Laser Light Projector is simple and effective. Simply plug it in, turn it on, and your home or garden is instantly illuminated in green and red lights. The lights can cover up to 2,1000 square feet from a distance of 25 feet, so it’s a perfect projector for large areas. You’re able to set it to motion, flashing, or stationary lights, depending on how you want your Christmas decorations to look.
There’s a built-in timer function with the laser lights automatically turning off after 6 hours of use before turning on again after 18 hours, so you don’t have to worry about fussing with it. There’s also a remote so you can turn it on and off from the warmth of your house. It’s a great way of ensuring your house stands out on the street.

Another solid entry for laser lights is the LSIKA-Z RGB Waterproof Laser Christmas Lights. They offer green, red, and blue lights over 1,000 square feet. In addition to the extra color option, there are also more options for how things are lit. You can choose to have one color projected or opt for a combination. Timer settings allow for durations of 2, 4, 6, or 8 hours, with flashing or static lights also an option.

Google Calendar Events are a great way to organize meetings, but no meeting is complete without a slideshow, spreadsheet, pictures, or reports. Fortunately, you can easily attach anything from your Google Drive or your local hard drive to an event.
Adding attachments to an event gives you an easy way to share materials with attendees ahead of time. It also lets them pull up those materials at the meeting without having to hunt around for them.
Fire up Google Calendar in your web browser and click the red “+” to create a new event.

Next, click the paperclip icon located in the event detail tab to add an attachment.

RELATED: How to Juggle Multiple Google Calendars
You can add files from your Google Drive, files that others have shared with you through Drive, or upload files from your local hard drive. We’ll be using the Google Drive option for this guide, but the others work just the same.

If your iDevice starts acting strangely and you’ve run through the gamut of normal troubleshooting fixes, Recovery Mode may be your answer. This lets you easily reset the device and re-install iOS using iTunes.
When you reinstall iOS, there’s a chance that you may lose all the data on your phone, so it’s good to stay in the habit of making regular backups on your computer via iTunes or iCloud. With that said, here’s how you can boot your iOS device into Recovery Mode.
First, you’ll need to make sure you’re using the latest version of iTunes. With the program open, head to iTunes > About iTunes.

Make a note of the version you’re using, and check it against this official Apple Support page to see if you’re on the newest release.

With that out of the way, you’re ready to get started. The rest of the procedure varies slightly depending on what device you’re using, so we’ll go over them one at a time.
If you’re using an iPhone 7, 7 Plus, 8, 8 Plus, X, XS, XS Max, or XR, here’s what to do.

Instagram has added the ability for users to share stories with only a specific subset of people, rather than just anyone who follows them.
Users simply create a “Close Friends” list and then choose to only share certain stories with that group of people. To access the feature, go to your profile in the Instagram app and select “Close Friends List” in the side menu. From there, you can add your closest friends to the list. Whenever you share a story, you’ll have the option of sharing it with everyone or just your Close Friends.
There are a couple of things to be aware of. First, no one can request to be added to your list, so there will never be that awkward part where someone wants to join your list, but you’re not really feelin’ it. Secondly, your friends will know if you’ve added them to your Close Friends list, as a green badge will appear on their end when viewing stories that you’ve shared with only your list.
Better yet, people that you haven’t added to your list won’t see any of your designated stories at all, and won’t even know that they’ve been left out. Savage!
via Instagram

If you’re an Apple Music subscriber who also lives in an Echo household, then you’ve likely been irritated by the lack of compatibility between the two. Be annoyed no more, dear music lover, Apple Music is coming to Echo.
Announced today on its Day One blog, Amazon said that Apple Music is coming to Echo devices “this holiday season,” which means we should see it within the next few weeks. Alexa users will be able to request artists, albums, songs, or playlists directly from Apple Music, as well as the “expert-made” radio stations.
Apple Music support brings Echo devices closer to rounding out all the big names when it comes to music streaming—Prime Music, Music Unlimited, Pandora, Deezer, TuneIn, Spotify, and iHeartRadio are all currently available.
via Amazon

Everyone’s heard about the blue screen of death (BSOD) that appears when your Windows PC crashes. But did you know Windows 10 has a green screen of death, too?
The green screen of death only appears when you’re running an Insider Preview version of Windows 10. It’s the same as the blue screen of death, and it will show the same error messages.
In other words, anything that triggers a blue screen of death on a normal version of Windows 10 will trigger a green screen of death on an Insider Preview version of Windows 10. The only difference is this screen says you’re using a “Windows Insider Build” and it has a green background instead of a blue one.
The green color highlights that the error was generated by unstable development builds of Windows 10. These Insider builds often have crashes and bugs you wouldn’t experience on a normal version of Windows 10. Microsoft sometimes warns of “green screen” errors Windows Insiders may encounter while running this development software.
If you see a green screen of death (GSOD) on your PC, that’s a sign you’re using an Insider Preview build of Windows 10. The problem could just be a bug in the unstable build, although it could also be a deeper problem with your PC’s hardware or drivers. You won’t know for sure until you go back to a stable version of Windows 10.
Microsoft made this change back in the Creators Update, which was released in April 2017. Before that, Insider builds of Windows 10 used standard blue screens of death.
If you’re using an Insider Preview build of Windows 10 and want to see it for yourself, this registry hack for manually triggering a blue screen still works—and it’ll trigger a green screen with the “MANUALLY INITIATED CRASH” stop code.
RELATED: Everything You Need To Know About the Blue Screen of Death
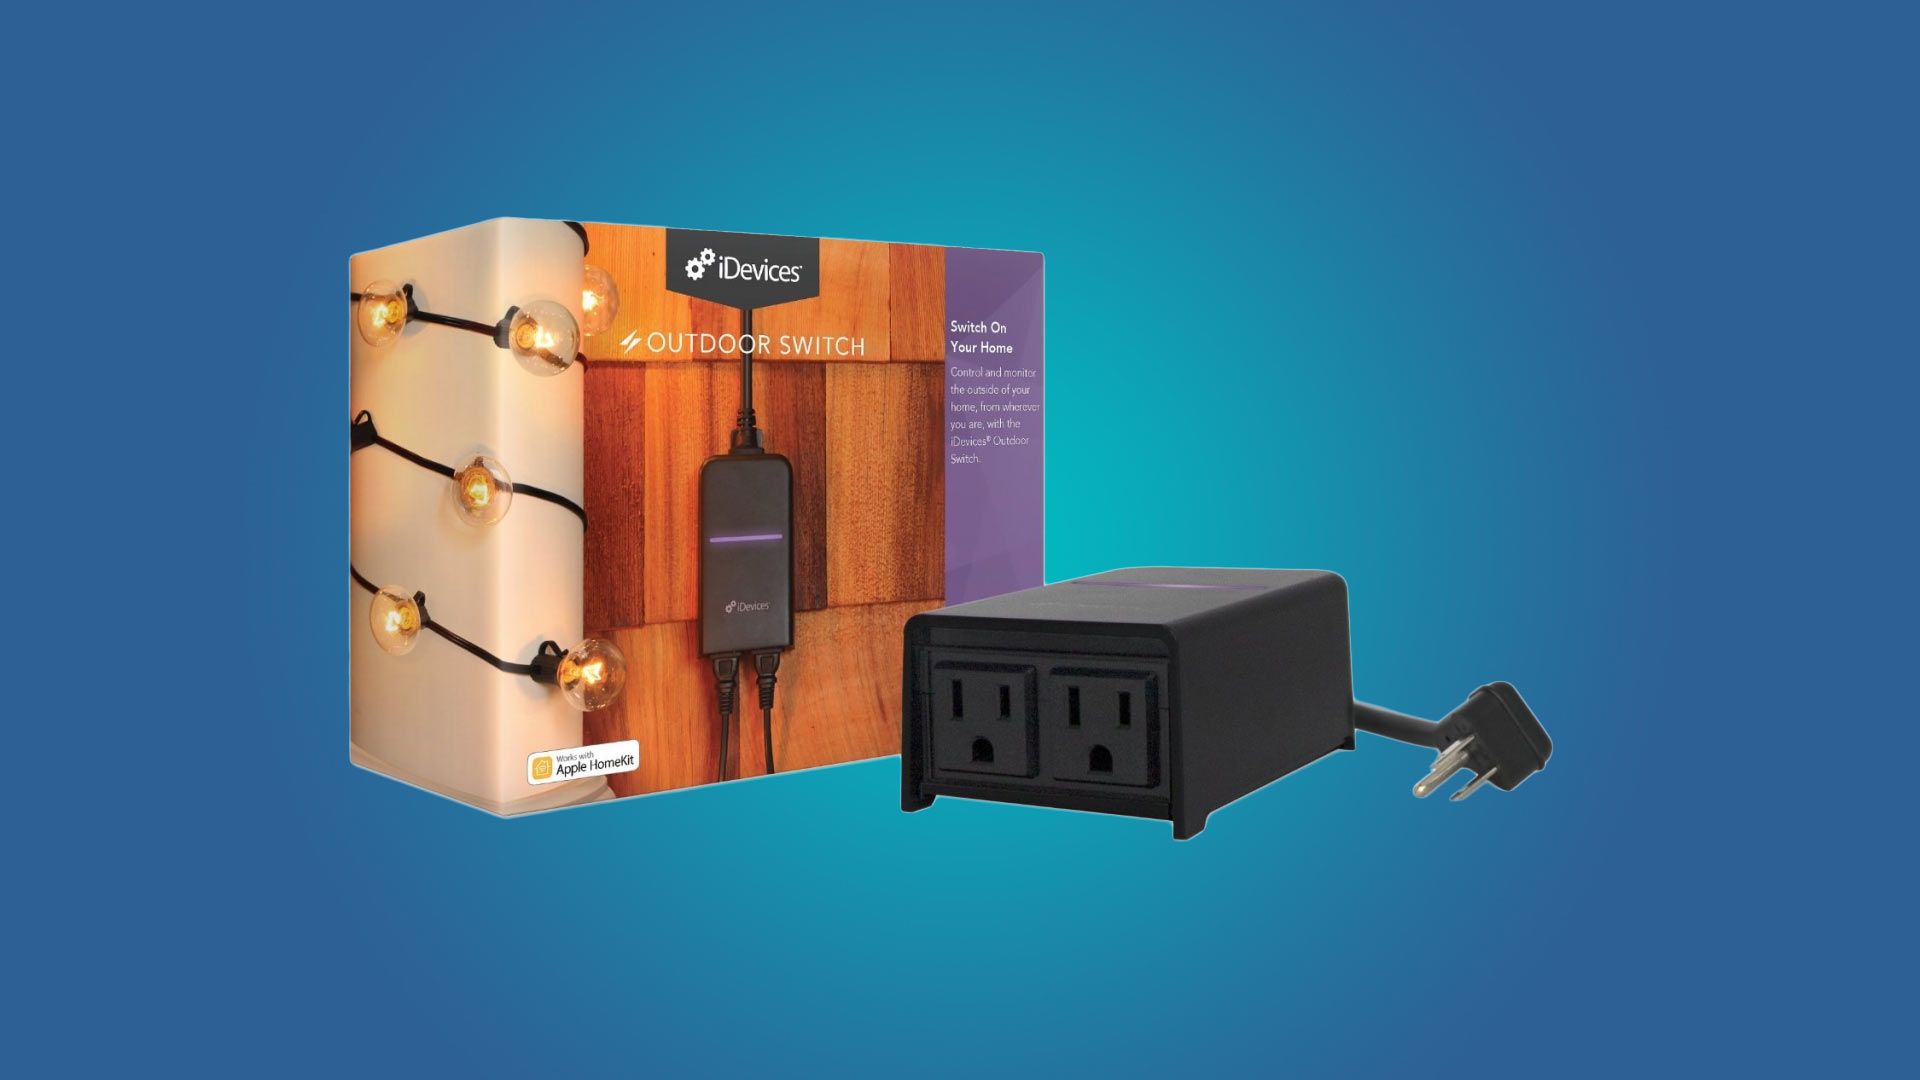
Tired for drudging out in the cold to plug your lights in? Automate your Christmas lights and decorations with these awesome outdoor-rated smart home plugs.
Nothing is more annoying than going outside to plug in your Christmas lights every night, and then unplugging them in the morning. Not only is it annoying to go out in the cold, but leaving your lights on all night isn’t the most efficient use of power (who’s really enjoying them at 4AM after all). Sure, you could use a simple remote-controlled plug like this one, but a smart plug will be able to fully automate your lights for you with a schedule and can even allow you to turn the lights on and off with your smart home assistants.
Here are some of the best outdoor smart plugs to consider for your Christmas lights, or any other outdoor light fixture or appliance.

If you’re just looking for a cheap and simple way to add smarts to your outdoor Christmas lights, the iClever IC-BS06 smart plug is a great way to go.
At only $30, it’s one of the cheapest outdoor smart plugs on the market, and better yet, it comes with two receptacles that can be individually controlled, so it’s like you’re getting two smart plugs for the price of one.
We’ve written a full review of this product, so be to check that out if you’re interested in buying it. But the gist is that it works with both Alexa and Google Assistant, and it’s IP44-rated, which means it’s protected from water splashes, so it’s good in the rain or snow.
The accompanying app does leave something to be desired, but if you set it on a schedule or use voice control with it, then you shouldn’t even have to deal with the app at all.

Most web traffic online is now sent over an HTTPS connection, making it “secure.” In fact, Google now warns that unencrypted HTTP sites are “Not Secure.” So why is there still so much malware, phishing, and other dangerous activity online?

Chrome used to display the word “Secure” and a green padlock in the address bar when you were visiting a website using HTTPS. Modern versions of Chrome simple have a little gray lock icon here, without the word “Secure.”
That’s partly because HTTPS is now considered the new baseline standard. Everything should be secure by default, so Chrome only warns you that a connection is “Not Secure” when you’re accessing a site over an HTTP connection.
However, the word “Secure” is also gone because it was a little misleading. It sounds like Chrome is vouching for the contents of the site as if everything on this page is “secure.” But that’s not true at all. A “secure” HTTPS site could be filled with malware or be a fake phishing site.
RELATED: Why Does Google Chrome Say Websites Are “Not Secure”?

HTTPS is great, but it doesn’t just make everything secure. HTTPS stands for Hypertext Transfer Protocol Secure. It’s like the standard HTTP protocol for connecting to websites, but with a layer of secure encryption.
What Are The Plastic Lumps Found On The Ends Of Computer Cables Called? |
|
Think you know the answer? |
|

A few months ago, we heard rumors of Ikea launching their own smart plug under their existing Tradfri smarthome product line. It’s now available in Ikea stores and online, but you probably shouldn’t buy it for a number of reasons.
Sight unseen, $10 for a smart plug sounds like an amazing deal. After all, the next cheapest smart plugs worth buying are usually only $16-$18, and that’s during a really great sale. However, there are a lot of caveats with this Ikea Tradfri smart plug, unfortunately.
For starters, you need the Tradfri gateway in order to connect the smart plug to your network, since it uses ZigBee rather than just straight-up Wi-Fi. It’s possible that it could connect to any ZigBee hub, like the Echo Plus, but that’s not officially known at the moment.
The Tradfri smart plug is expected to work with Apple’s HomeKit platform at some point in the future, so that’s definitely a plus, but there’s no word on whether or not it will work with Alexa or Google Assistant, which would be a huge downer if it didn’t work with voice platforms. However, existing Tradfri products do with Alexa and Google Assistant, but the smart plug itself is unknown.
In any case, rather than getting the Tradfri smart plug, it’s probably better to spend a bit more cash and get a Wi-Fi smart plug instead, like TP-Link’s Kasa smart plug, which can be had for $18. It’ll do pretty much anything you want it to, and it doesn’t require a separate hub or gateway.
However, if you already have a Tradfri gateway and use Tradfri products anyways, the Tradfri smart plug actually may not be a terrible bet, especially for such a low cost.
Source: Ikea via Pocket-Lint

The Files app, added in iOS 11, supports zip files. You can open them, see their contents, and extract files without any third-party apps. You’ll still need an app from the App Store if you want to create zip files.
When you download a zip file in Safari, your iPhone or iPad will offer to open it in the Files app. Tap “Open in Files” to do so. You can also save zip files to the Files app from other applications.

You’ll be prompted to choose a location for the zip file. You’re saving a copy of the zip file to this location.
Select a location—like your iCloud Drive or a folder on your iPhone—and tap “Add.”

Tap the zip file in your Files app to open it.

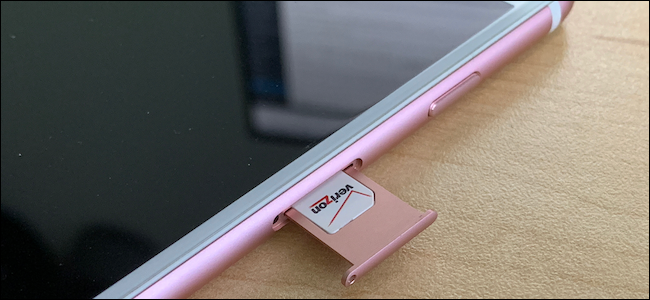
Every iPhone has a SIM card slot on its right side. That slot houses a tray that holds your iPhone’s SIM card. That SIM card lets your phone connect to your carrier so that you can make and get mobile data.
You might never need to access your SIM card if you bought your iPhone with one pre-installed from the carrier. However, if you buy a phone unlocked and SIM-free, or are buying used, you’re going to need to be familiar with what a SIM card is, and how to swap one out.
Thankfully, accessing an iPhone’s SIM card tray is not complicated, but you will need three things before you get started.
That final one can be a little tricky. Depending on which iPhone you have, there might be a SIM card removal tool in the box. If there is, you’re good to go. If not, they’re stupid-cheap on Amazon, but you can also use an unfurled paperclip, a needle, or pretty much anything else that is slim and pointy. Just try not to stab yourself as you go.
Once you have your SIM card removal tool (or a proxy), poke it into the small hole that forms part of the SIM tray. You should feel some resistance, and you need to push through that a little. If this is your first time doing this, it might feel a little odd, but you do need to exert a bit of force to get the tray out. Once you do that, the tray will start to eject, and all you need to at that point is pull it the rest of the way out.

Once the tray is out, remove any pre-existing SIM card and install the new one. Ensure that you have it the correct way around using the notched corners as a guide. Once the card is installed in the tray, re-insert the whole thing into your iPhone, ensuring the pin hole lines up with the hole in the phone as you do.


We all enjoy and deserve a good night’s sleep, but to get that, you need the right environment. A key part of that is a set of good sheets. Here are our top picks for every preferance.
You’re probably wondering just how you can figure out the best type of sheets. There are two key things to take into consideration—the fabric used and thread count.
Fabric is the material like wool, cotton, silk, flannel, and so forth. Each of them feels a little different, as you’ll have noticed with the clothes you wear. Cotton sheets are the most common type out there, as they’re considered good for heat regulation as well as easy laundry care. Not all cotton is the same though. The longer the cotton fibers, the more soft and durable the fabric becomes. That’s why sheets like Egyptian cotton and Percale are so poplar.
Thread count relates to the number of parallel threads in a square inch of fabric. A higher thread count typically means it’s softer and more durable. For you, that means a thread count of 200 is fine but a thread count of 400 is notably softer.
There’s a catch though. Some manufacturers advertise a thread count far higher than that and sometimes into the thousands. How can that many threads fit into a single inch? Well, they can’t. Some manufacturers count not just each thread but each fiber that makes up each thread. A single thread can be four fibers twisted together with one company calling it one thread while another calls it four. Suddenly, buying the highest thread count isn’t so easy after all.
Fortunately, we’ve done your research for you. The sheets here are all good quality and sure to make your bed feel so much cosier. Here are the best sheets for a great night’s sleep.

Percale cotton is known for its crispness and durability. That might not sound instantly comfortable but it continues to soften after each wash, taking the edge off its initial stiffness.

Android Auto probably gets my vote for the best Android tool that often gets overlooked, and Google just announced some nifty features to make it even better—especially if you have a dedicated head unit for Auto in your car.
For starters, Auto will soon be able to offer up message preview when your vehicle isn’t moving. This way, you can quickly see what a message is without having to have it read aloud but it still continues to prevent distractions while you’re driving.
I already know what you’re thinking here: but I don’t want everyone else in the car seeing my messages! I’m with you on that—and this feature can be disabled. Phew.

What’s even better, however, is the improved media options. Google Play Music, Play Books, iHeartRadio, Pocket Casts, and Spotify will all benefit from larger album art and a more intuitive, touch-friendly layout when looking for something to listen to.
Search results when using your voice are also getting improvements. Currently, when you tell Google Assistant to play music, it just starts playing whatever you requested; for example, “Play Whiskey Myers” will simply shuffle all Whiskey Myers songs (which isn’t a bad thing—they don’t have a bad song).
With the new update, however, when you search for something, it will offer curated search results with that artist, genre, or album. That’s so much better.


The next version of Windows 10 is codenamed 19H1 and expected for release around April 2019. In 19H1, Windows Update now displays an icon in your notification area when you have to reboot your PC for updates.
This new icon was highlighted by Microsoft in a blog post announcing Windows Insider build 18290:
Starting with 19H1, when your device has an update requiring reboot (including new builds we release) you will see Windows Update icon with orange indicator in the notification area (system tray) alerting you to restart your device.
Some people may not like the extra clutter, we think this is a great idea. It’s a more unobtrusive way to highlight updates than a big “You need to restart your PC” message that interrupts what you’re doing. When you see the icon, you know that you should probably restart your PC at some point that day. Consider it an advance warning before Windows Update gets really annoying.
This system tray icon was off by default on our test system. To enable it on Windows 10 19H1, head to Settings > Update & Security > Windows Update > Advanced Options and set the “Show a notification when your PC requires a restart to finish updating” option to “On.”
This latest build also features some other interesting changes, including a microphone icon in your notification area that shows you what app is currently using your microphone.
Microsoft has also added a “Sync now” button and information about when your clock last synced to the Settings > Time & Language > Date & Time screen. This should help if your PC’s clock every gets out of sync—for example, if it fails to update for Daylight Saving Time.
Other changes include To Do integration in Mail & Calendar, fluent design updates for the Start menu, and some updates to the Search and Cortana interfaces. For example, the Search and Cortana panes now support Windows 10’s new light theme.

Whether you want to add a little flair, or you want some text to flow along with the curve of another element (like clip art or a logo), making your letters curve along a path in Word is pretty easy.
First, click “Insert” on the main Word ribbon.

Click “WordArt” from the text options.

Select the style you want your WordArt to be. You can go for anything from plain-looking text to something super-fancy.

Type your text in your newly selected WordArt box.

Packing cubes may seem like a redundant addition to your suitcase or carry-on bag, but they’re actually fantastic tools for organizing and economizing your luggage. Why not make travel easier with an affordable set of packing cubes?
Whether you’re a travel novice or expert, packing cubes are great for making the most of your luggage. A good set of packing cubes can help you separate and organize your clothes for a trip, all while reducing wrinkles and making unpacking extra easy. Not to mention, packing cubes help to economize space, so you can fit an extra jacket or pair of jeans in your carry-on bag. You can even combine packing cubes with a vacuum bag, if you’re packing for an extended stay away from home.
There are a lot of options in the world of packing cubes, so finding a set that’s right for you can feel a little daunting. That’s why we’ve found the best packing cube sets at every price point and highlighted their best features (and shortcomings).

Yes, the Bagsmart 6-cube set looks more like a bunch of lunchboxes than a set of packing cubes. But that lunchbox aesthetic is actually a sign of quality and durability. The thick plastic lining of the Bagsmart packing cubes ensure that your clothes will remain dry and wrinkle-free. Plus, the Bagsmart cubes are durable enough to survive years of flights or any other form of abuse.
The largest cube in the Bagsmart set is 13.8″ x 13.8″, and the smallest cubes are 6.9″ x 6.9″. All of the Bagsmart cubes are about 3.5″ deep, which is actually perfect for large bags or carry-on suitcases. Although the tops of the bags are made of a thick plastic, their sides are actually a flexible mesh. It’s easy to see what’s in each bag, but you have to take them out of your suitcase first, which is good for privacy but also mildly inconvenient. All of the Bagsmart cubes have handles, which makes them great for hauling or hanging.
Again, these packing cubes are worth the money. They can hold a lot of clothes, they’ll keep your things from getting wrinkled, and they can handle the mistreatment that all luggage inevitably experiences. But you may want to consider a less expensive or smaller set if you travel infrequently.

The Shacke Pak 4-cube set is a great, mid-range packing cube set with tons of space and durability. It can hold a ton of items, even though it only comes with four cubes. The largest cube in the Shacke Pak set is 17.5″ – 12.75″, and the smallest cube is 11″ – 6.75″. All of these cubes are 4″ deep, which is more than enough space for all of your bulky sweaters and jeans. They all have little mesh windows, so that you can see what’s in each cube at a glance. And the Shacke Pak even comes with a travel hamper, which is a better place for your dirty clothes than the floor of a guest room or hotel room.

Google Assistant is really good and quite useful, mostly because Google is constantly adding new features to make it better. Today, Google announced a slew of new features for Assistant—but they really shine on Home Hub.
If you’re a Nest Hello user, you can already see on your smart display (like Google Home Hub) when someone rings your doorbell. But soon you’ll also be able to talk to them before going to the door. When someone hits you up on the ol’ doorbell, just tap the “Talk” button on your smart display to find out exactly what they want. The only downside is that it’ll be harder to ignore them when someone knows you’re home.

Assistant’s “Broadcast” feature is neat—just say “Hey Google, Broadcast <some words>” and it will send a recording of your voice saying those words to all the Google Homes in your house. The issue is that this is one-way communication, at least until now.
With Broadcast Replies, users will be able to respond to these broadcasts from smart displays, Android phones, and even other Google Home speakers. It’s like an intercom that works anywhere.
One of the best features of the Google Home Hub is Google Photos’ integration so it’s a digital picture frame when it’s not doing something more productive. Regardless of how well you curate your Google Photos collections, however, there’s always one or two pictures that slip through the cracks and show up when you don’t want them to. Starting now, you’ll be able to dismiss those photos and never see them on your Home Hub (or other Smart Display) again. Cool.
Along the same lines, you’ll also be able to “favorite” photos that you really like. Also cool.
Finally, touch alarms will make their way to the Quick Settings panel on Smart Display. Pretty useful for quick timers and whatnot.