
Which Country Has The Longest National Anthem? |
|
Think you know the answer? |
|

Source: How-To Geek
Which Country Has The Longest National Anthem? |
|
Think you know the answer? |
|
Famed Psychologist B.F. Skinner Once Taught Pigeons To? |
|
Think you know the answer? |
|

Most operating systems have a built-in task manager or resource monitor that lets you see all active processes and programs running on your computer. The Chrome web browser also has one that helps you end troublesome tabs and extensions.
To open Chrome’s Task Manager, click the “More” button (three dots), hover over “More Tools,” and then click on “Task Manager.” Alternatively, press Shift+Esc on Windows or Search+Esc on Chrome OS to open Task Manager.

With Chrome’s Task Manager now open, you can see a list of all tabs, extensions, and processes currently running in the browser.
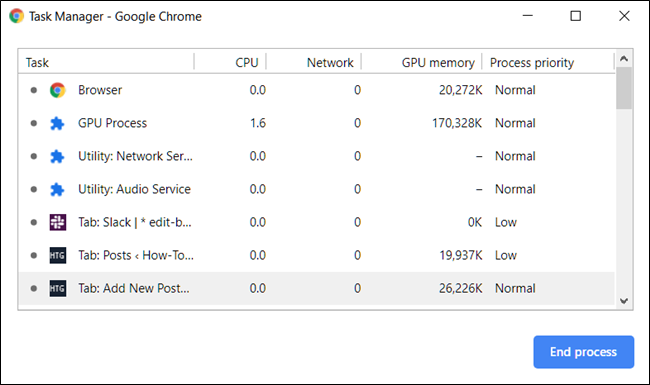
You can end any of the processes from this menu, which can be helpful when an extension or tab stops responding. To do this, click on the process and then select “End Process.”

You can kill more than one process at a time by holding down the Shift or Ctrl key (Command on Mac), highlighting multiple items from the list, and then hitting the “End Process” button.
Should you need to copy text from one document into another, don’t worry. Copying and pasting on a Chromebook works identically to how it works on any other operating system, and you can do it in a couple of ways.
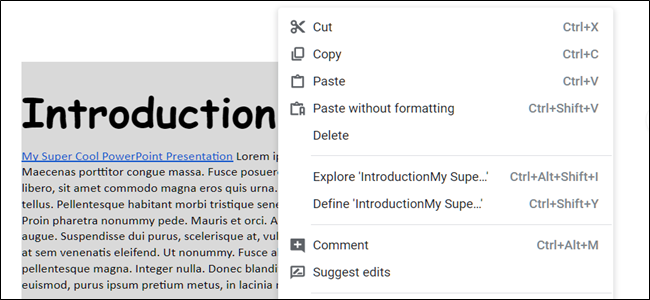
The first thing you want to do is open up a document or webpage and highlight the word(s) or line(s) you want to copy. Right-click the selection—either with two fingers on a trackpad, with a mouse, or by pressing Alt while clicking—and then click “Copy.”

RELATED: How to Right-Click on a Chromebook
Alternatively, instead of using the right-click context menu, you can press Ctrl+C to copy the highlighted text to the clipboard.
Tip: If you want to altogether remove text from a document while copying it to the clipboard, click “Cut” from the context menu or press Ctrl+X instead.
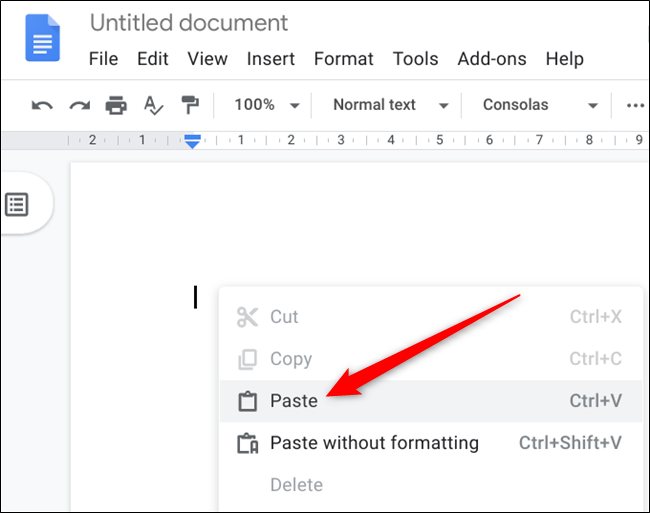
Now that you have text copied to the clipboard, open up a document, word processor, or text box (such as Chrome’s address bar) to paste it into place. Click the mouse cursor where you want to paste the text, right-click, and then select “Paste” from the context menu that appears.
The First Wearable Computer Was Used For What? |
|
Think you know the answer? |
|

If you want unrestricted editorial rights to a read-only PowerPoint presentation, then you have to unlock it. The good news is that you can open it in a few simple clicks. Here’s how.
There are two ways to tell if a presentation is a read-only file. The first is if you see the words “Read-Only” after the title of the presentation. The second is if you see a yellow message bar across the top of a presentation with a message letting you know the document has limited access.
Next to the yellow banner message will be a button that reads “Edit Anyway.” Click that button to unlock the PowerPoint.

The yellow bar should disappear along with the “Read-Only” text that appeared after the presentation title. Your PowerPoint will now be editable.

As the saying goes, there’s more than one way to cook an egg. The same applies to unlocking a presentation. Although this method involves a few extra steps, we wouldn’t be real geeks if we didn’t show you how.
First, open the read-only presentation and select the “File” tab.

Your Chromebook comes equipped with a built-in camera you can use to snap pictures to post to your social media accounts or share with friends and family. Here’s how to take a photo on a Chromebook.
Google recently rolled out Chrome OS 76 stable, which came with a bunch of new features such as Virtual Desks and a redesign of the Camera app. Google moved the position of the shutter button and camera mode, added a landscape mode, and implemented some much-needed improvements to shutter speed.
For this tutorial, we will use the stock Chromebook camera app, though you can use any camera app from the Play Store that you prefer.
First, open the Camera app on your Chromebook. You’ll find it under the launcher menu. Tap the “Search” button on the keyboard and search for “Camera.” Alternatively, click the “All Apps” button and look for the camera icon.

Once the app opens, click the shutter button, located on the right side, to snap a picture.

By default, the photo is taken in landscape orientation. However, if you click “Square” before the shutter button, your photos will be square in shape with equal portrait and landscape dimensions.
Which Drink Is, Thanks To Federal Law, Now Artificially Flavored? |
|
Think you know the answer? |
|
Embedding an informational podcast in your PowerPoint can be an invaluable way to enhance a presentation. Here’s how to add podcasts to your slideshow from your computer or from the web.
When you think podcast, you might think of an audio presentation that’s stored on the internet. However, podcasts are simply audio files, so if the show is downloaded onto your computer, the process is as simple as uploading music to PowerPoint.
Note: If you don’t have the podcast’s audio file, you can skip to the next section where we show you how to embed a podcast you find on the web.
RELATED: How to Get Started Listening to Podcasts
Open PowerPoint and navigate to the slide in which you would like to embed the podcast. Next, select the “Insert” tab and, in the “Media” group, click “Audio.” A drop-down menu will appear. Here, choose “Audio on My PC.”

The “Insert Audio” window will appear. Navigate to the location of the podcast, pick the audio file, then choose “Insert.”


If you find yourself perpetually out of paper towels, dish soap, or other household essentials, why not steal a simple inventory management trick from the business world?
Do you know what your local grocer doesn’t do? They don’t wait until someone has purchased the last bottle of dish detergent to order more. Nor do they let the sum stock of the entire paper towel aisle drift down to zero before calling in a semi-trailer or two full of paper products.
While the stocking methodology for big-box retailers is sophisticated, the key concept you can (and should) steal from their workflow is called the “reorder point.” It’s the point at which a business orders more of a given product because their existing stocks are low and the goal is never to have empty shelves and disappointed customers.
Have a little extra storage space around your home? You can apply the same concept on a less sophisticated scale (no management team or nation-wide logistical network required). Buy two of the basic staples you need the next time you go shopping, and then buy a replacement when the first item runs out. Your “reorder point” for all household staples then becomes “when I only have one” instead of “oh no, I’m out!”—so then you and the rest of the “customers” in your household can skip the disappointment of empty shelves.
Buy two jugs of laundry detergent, buy a replacement when the first jug runs out. Buy two containers of cleaning wipes, buy a new one when the first runs out. Tampons? Face wipes? Shampoo? You got it—if you use it regularly and it’s a hassle to run out of it, buy a second one and keep the “buy one when the first runs out” system rolling.
You’ll spend a small amount of extra money upfront, and you’ll sacrifice a little bit of storage space. But going forward, you’ll always have extra laundry detergent, cleaning supplies, toilet paper, and other shelf-stable essentials on hand. Then when life gets hectic around the holidays or if there’s a nasty cold that hits everyone in your household, you can coast for a little bit on the “backup” supplies if need be—and nobody needs to make a toilet paper run high on cough syrup.

An internet connection can be unpredictable at times, and a sudden drop of the connection while downloading a large file can be frustrating. However, Google Chrome lets you resume downloads if they unexpectedly stop.
Google Chrome uses a built-in download manager to display all your downloads—active, failed, canceled, and completed. The manager opens in its own tab and shows a list of every file you’ve ever downloaded in Chrome.
Note: Some websites don’t allow for you to resume a download if it fails to complete the first time around. Certain web servers don’t remember your request to download the file, forcing it to start from the beginning all over again.
To open the download manager, type chrome://downloads into the Omnibox and hit the Enter key. Alternatively, you can press Ctrl+J on Windows or Command+J on macOS.

In the list of downloads, find the failed item and click “Resume”.

If everything goes right, your download will resume from where it left off before you were disconnected.

Today, Insta360 announced its first non-360 camera. The Insta360 GO is tiny, about the size of your thumb, and stabilized for on-the-go video. The $200 camera takes 30-second clips and will mount just about anywhere.
Insta360’s newest camera, available today, is a departure from its previous offerings. Instead of focusing on 360 videos, the Insta360 GO camera records your life in action.
The camera is magnetic and when paired with a medallion lanyard you wear under your shirt, will attach to your chest. Additional mounts will let you attach it to a headband, your car dash, and more.

To help with the “put it anywhere” concept, the company made the camera tiny, weighing in at just 20 grams (.7 ounces). But despite that small size, the camera contains stabilization technology to give you smooth video even as you walk and run.
When you press record, the camera will take a 30-second clip or 15 seconds of slow-motion video. The camera saves to Inta360 GO’s 8 GB of onboard storage. The company says you can record about 200 clips in a day before needing a recharge.
If you want to change it up, you can also record hyperlapse videos. Mount the camera, start the hyperlapse, and you can record up to 30 minutes of footage at 6X speed.

Google launched the first-generation Chromecast back in 2013, and it’s still getting security updates—but that’s it. As Google confirmed to 9To5Google, this original Chromecast won’t get new features. It may be time to upgrade if you have an old one.
Checking whether you have a first-generation Chromecast is simple. You can either look at the Chromecast hardware itself or pull up the Google Home app on your smartphone.
If you don’t remember off the top of your head, just peek behind your TV and see which one is plugged into your TV’s HDMI port.
The first generation Chromecast was more of a stick with a rounded end, while second generation and newer Chromecasts are a full circle.
In the photo below, the Chromecast on the left is a first-generation Chromecast. If your Chromecast looks like the one on the left and not the ones to the right, you have an older Chromecast that’s only receiving security updates and not new features.

You can also check via the Google Home app on your mobile device. Make sure your phone or tablet is connected to the same Wi-Fi network your Chromecast is using and then open the Google Home app for Android, iPhone, or iPad.
Tap the Chromecast you want to find the version of.
What Did You Have To Defeat In The Super Secret Level Of Nintendo’s Hit Star Fox? |
|
Think you know the answer? |
|

When you create a survey with Google Forms, you can use conditional questioning to send respondents to specific pages based on their answers. Here’s how you can use branching logic to send people to questions that pertain to their responses.
The first thing you want to do is open the Google Forms survey where you want to use logic branching. If you don’t already have a survey prepared—or if you haven’t ever used Forms before—check out our beginner’s guide to Google Forms to help you get started.
RELATED: The Beginner’s Guide to Google Forms
Once you have the survey open, separate the questions that will have branching logic into different sections. You can create a new section by clicking on the icon that looks like two rectangles.

Give each section a title. Doing this makes it a lot easier to differentiate each section and link answers together.

To add more questions to your form, click the plus sign (+). If the questions already exist in your survey, drag them directly into the section where you want them to appear.

A combo chart in Excel displays two chart types (such as column and line) on the same chart. They are used to show different types of information on a single chart, such as actuals against a target.
In this article, we’ll demonstrate how to make a combo chart that follows the same axis and one that displays mixed types of data in a single chart on a different axis.
In the first example, we will create a combo chart to show monthly revenue against a target using the sample data below.

You can see that the target value is the same each month. The result will show the data as a straight line.
To get started, select the range of cells you want to chart—A1:C13 in this example. Next, click Insert > Insert Combo Chart. Select “Clustered Column – Line.”
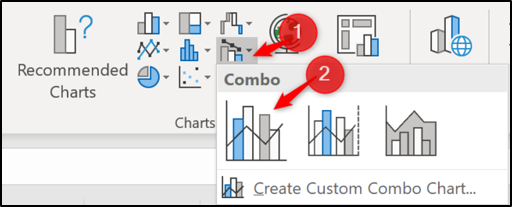
The combo chart is inserted with both the column and line using the same axis. Easy as that!

Web browsers are dropping support for Flash, but what if you have an SWF file to open? Never fear: Adobe offers a hidden Flash Player download for Windows, Mac, and Linux. You can open an SWF file outside your browser.
Adobe hides the standalone Flash Player very well. It’s actually called the “Flash Player content debugger” on Adobe’s website.
To get it, visit the Debug Downloads page on Adobe’s Flash Player website. Click the “Download the Flash Player projector content debugger” link under Windows, Mac, or Linux, depending on which operating system you’re using.

On Windows, you’ll have an EXE file that needs no installation. Just double-click it to run it.

You’ll get a simple Adobe Flash Player window. To open an SWF file, either drag and drop it to the window or click File > Open. You can browse to an SWF file on your local system or enter a path to an SWF file on the web.


The command line is almost 50 years old, but it’s not outdated. Text-based terminals are still the best way to accomplish many tasks, even in the age of graphical desktops and touch-screen gadgets.
In fact, the command line is becoming more respected than ever with Microsoft creating a powerful new Windows Terminal application. Windows 10’s PowerShell environment is surprisingly powerful, but Microsoft still went out of its way to add support for basically the full Linux command-line environment to Windows 10.
At one time if you wanted to interact with a computer, you typed. That was it. There was nothing else. That might sound restrictive and archaic, but as a step-up from having to use punched cards or perforated paper tapes, typing was radical and transformative. And migrating from teletypewriters with their rolls of paper to terminals with cathode ray tube (CRT) screens was another ground shift in human and computer interactions.
That step paved the way for the interactive shell to really come into its own. Now you could send instructions to the computer and very quickly have responses displayed on your screen. No more clack-clack-clack as you waited for your paper printout to clatter its way out of your teletypewriter.
Fair enough, but that was then, this is now. Computing is a whole different ball game. Apart from the obvious locked-in cases like using a computer that doesn’t have a graphical desktop environment installed, or using a remote computer via SSH over a low bandwidth connection, or controlling a headless or embedded system, why use the command line over a graphical desktop?
Terms like command line, terminal window, and shell are used almost interchangeably by some people. That’s incorrect jargon. They are all quite different. They’re related, but they’re not the same thing.
A terminal window is a window in a graphical desktop environment that runs an emulation of a teletype terminal.
The shell is the program that runs inside the terminal window. It takes your input and, depending on what you typed, tries to interpret and execute the instructions itself, pass them to some of the other utilities that make up the operating system, or find a script or program that matches what you have typed.
The Japanese Word For Bad Is Incorporated Into Which Video Game Character’s Name? |
|
Think you know the answer? |
|
If your background image is drawing unnecessary attention, or you need to blur part of an image that contains sensitive information, you can do so directly in PowerPoint. We’ll show you how.

First, open PowerPoint and navigate to the slide containing the image you want to blur. Select the image, and that automatically opens the “Picture Format” tab.

Next, select “Artistic Effects” from the “Adjust” group.

In the drop-down menu that appears, click the Blur option.
